
The following sourdough starter recipe has been extracted from The Bread & Butter Project recipe book How to Bake Perfect Bread.
DID YOU KNOW...
Making a sourdough starter will take about three weeks.
If you have a source available then by all means take a small portion of an existing sourdough starter, feed it, and begin making bread. However creating a starter completely from scratch will give you a deeper understanding of the relationship between the flour, water and natural yeast. If you follow the process the whole way through you will end up with a strong, healthy starter and a great insight into what is happening inside your bread dough.
How sourdough starters work:
The basic building blocks of leavened dough (a dough that rises) are yeast cells - either commercial or natural. What do these yeast cells need to thrive? They need a food source, moisture and a desired temperature range. The starter provides the yeast with the three key components all living things need. The food source is sugar (in the starch). Very simply, yeast is a single-celled organism that converts sugar into carbon dioxide. If you were making wine, the sugar from the fruit would be the food source and the alcohol would be the more significant consequence of the yeast growth. When making bread, the starches in the flour are the food for the yeast and we value the carbon dioxide the yeast produces.
So...let's begin!
DAY 1
You will need:
- a 1kg glass jar, very thoroughly cleaned
- 100g organic white flour
- 100g water (the purest you can access), at room temperature
- 3 organic sultanas (make sure they are oil free)
- a piece of muslin
Using a spoon, mix the flour and water in the jar. Throw in the sultanas. Cover loosely with the muslin and you have finished. From here it's up to nature. (The glass jar will enable you to see the process of fermentation as the natural yeasts produce carbon dioxide which forms as bubbles. This will gradually increase throughout the process.) Leave the covered jar at room temperature until the same time the next day.
You will notice in Bread & Butter Project recipes and breadmaking methods that they often let the natural cause and effect of combining flour, water and yeast take its course. Grapes are used to make wine, so the sultanas will most likely be a good source of natural yeasts and also provide an added sugar hit.
DAY 2
Although it won't yet be very noticeable, natural yeasts will slowly be multiplying, beginning the creation of your new starter. Remove the muslin and discard half the mixture. We will continue to discard some of the starter until it is strong enough to make a dough. If you do not discard some starter every so often, you will waste a lot of flour feeding the starter, and it will soon become too large to manage. Add 50g of water and 50g of flour. Combine the ingredients to a lumpy paste and replace the muslin.
Leave at room temperature if your climate is below 25°C; otherwise, find a cool place between 15°C and 25°C.
DAY 3
The fermentation should now be gaining momentum. There should be more air pockets presenting on top of the mixture and on the side of the jar. A thin liquid may also be starting to form, as well as a slightly sour aroma. Remove the muslin, stir the mixture and then discard half the mixture. Add 50g of water and 50g of flour. Combine the ingredients to a lumpy paste and replace the muslin. Leave at room temperature if your climate is below 25°C; otherwise, find a cool place between 15°C and 25°C.
DAY 4
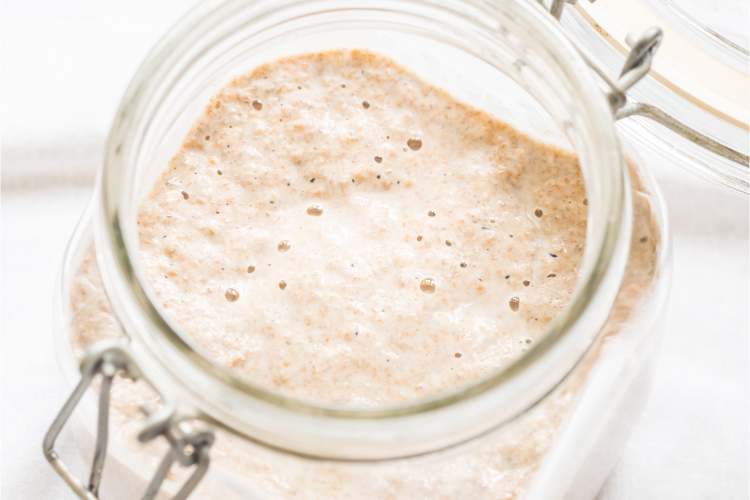
More bubbles should be apparent and the mixture will now be starting to gain volume. The gas being produced by the multiplying yeast cells is being trapped by the mixture, much as your future bread will trap gases. Remove the muslin and discard half the mixture. Add 50g of water and 50g of flour. Combine the ingredients to a lumpy paste and replace the muslin.
DAY 5
Remove the muslin. Add 100g of water and 100g of flour. Combine the ingredients to a lumpy paste and replace the muslin. We are starting to increase the size of the starter as it gains strength.
DAY 6
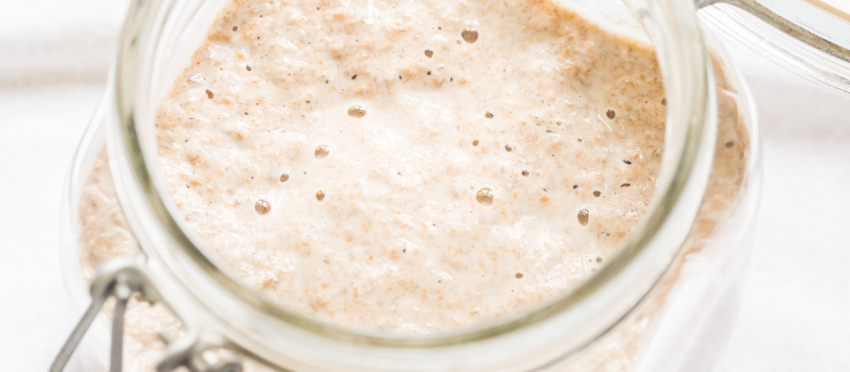
Larger bubbles should now be forming in your starter. You should be able to see the fermentation clearly on the side of the glass jar. Lots of dense bubbles let you that the starter is active and getting stronger. Remove the muslin and discard half the mixture. Add 100g of water and 100g of flour. Combine the ingredients into a lumpy paste and replace the muslin.
DAY 7
Remove the muslin and discard half the mixture. Add 100g of water and 100g of flour. Combine the ingredients to a lumpy paste and replace the muslin.
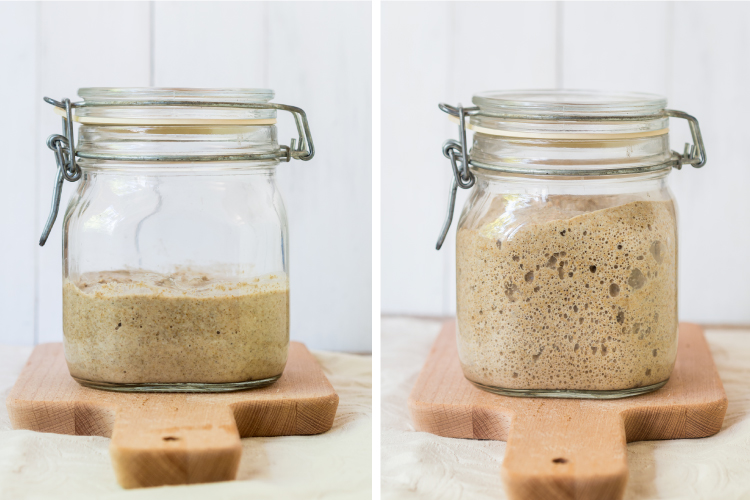
DAY 8 - DAY 21
You should now have the beginnings of an active and strong starter. What you are looking for is a thick and glossy mass that has large, visible bubbles. The desired consistency ill grow during the next two weeks of feeding. Each day, remove the muslin and discard half the mixture, and add 100g of water and 100g of flour. Combine the ingredients to a lumpy paste and replace the muslin.
At the end of the three weeks, you should have your own unique starter - now you can begin making your very own artisan bread.
TIME TO BAKE
Ready to bake your sourdough loaf? Make sure you grab a bag of premium organic flour! Wholegrain Milling Co. is our supplier of high quality stone-ground and roller-milled flours. Based in Gunnedah, NSW, this family owned business produces nutrient dense, superior flour from high quality, primarily Australian grown grains.

For more information on maintaining your starter, kneading techniques and amazing sourdough recipes, grab the Bread & Butter Project book: How to Bake Perfect Bread
From the creators of Bourke Street Bakery, The Bread & Butter Project is an artisan bakery delivering handmade bread daily to Sydney's fine food purveyors. As a social enterprise, 100% of The Bread & Project's profits are reinvested into baker training and employment pathways for communities in need.
![Supplier Spotlight [Food to Nourish]](https://cdn11.bigcommerce.com/s-dis4vxtxtc/images/stencil/160w/uploaded_images/blog-thumbnail-food-to-nourish.jpg "Supplier Spotlight [Food to Nourish]")


